GalaxyRVR battery life?

I just received the GalaxyRVR kit for Christmas. I’m going through the lessons and everything has been fine through Lesson 8. I have started Lesson 9 and made it to the part where you have the rover move and show different colors for different movements. As soon as I start running the 9_rgb_car_move program it performs the forward movement, but then stops when it is supposed to start the backward movement, and won’t do anything else. I plugged it back in and charge it up, tried it again and it does the same thing.

I stepped back to Lesson 8, charged up the battery and reloaded the 8_ultrasonic_ir_avoid sketch and it ran fine, for a couple of minutes around the house at least.

I tried re-writing the sketches for Lesson 9. The sketches for 9_set_color and 9_set_color_offset worked fine. Then I rewrote the sketch for 9_rgb_car_move. I wrote out the whole sketch, then went through and commented out the commands to make the wheels rotate, leaving on the parts where it changes the colors based on the movement it was making. This all worked as expected. I went back into the code and removed the comments from the wheel rotation lines and tried again. Again, the rover moved forward with a green light, then stopped and shut down, NO POWER again. I charged it up again, and again the same thing.

What gives? Have I broken this already?

More info:
When I plug the USB cable into the Rover, the wheels spin for forward movement, the LEDs light up green. This lasts for about 2 seconds, there’s a brief pause, then it does it again, over and over (loop?). However, it never goes to the next steps, moveBackward, turnLeft, turnRight, stopMove, and the lights never change color. When I unplug the blue USB cable everything stops. No power, nothing.

I plug in the black, usb-c cable. A red LED by the plug and two amber LEDs by the power switch come on. After a short while (a minute or two) the red light turns off. I assume this means the batter has stopped charging. Unplugging the usb-c cable and turning on the power switch the Rover does the same thing, runs forward for 2 seconds, the dies.

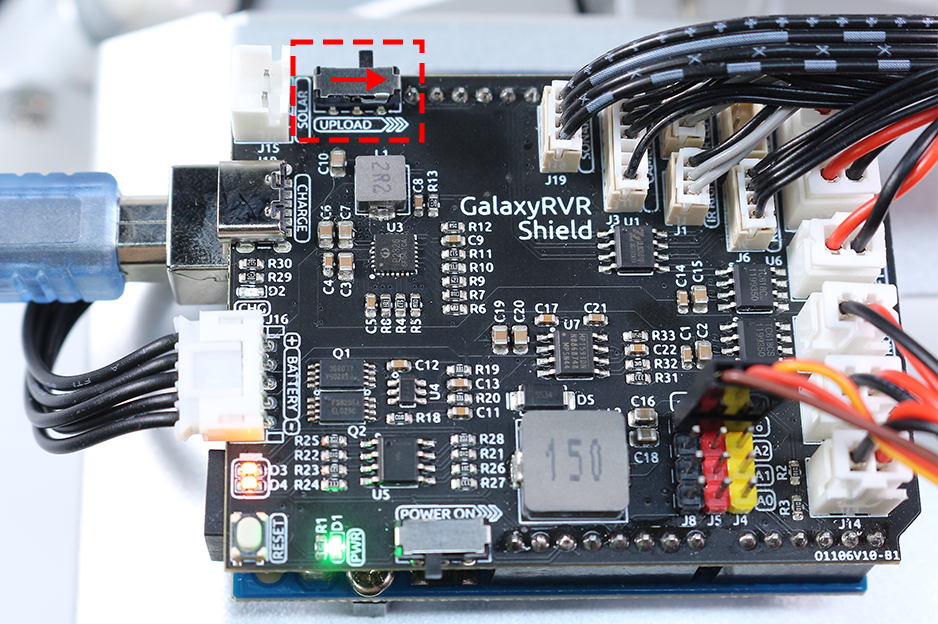
Also, What is the function of the “Upload” switch. I’m guessing it is a way to plug in the blue USB cable and allow you to communicate with the arduino board without it actually running. This is not the behaviour I get though. When I plug the blue USB cable, if there is code for the wheels to turn, they start turning, so I end up having to hold the Rover up off any surface while I’m trying to plug in the cable, upload code, then unplug the cable. What is the purpose of the “UPLOAD” switch? All the instructions / lessons say is if you have already fully assembled the Rover to move this switch to upload while uploading code. Are you supposed to move it the other way to actually put the rover into action? More information in the instructions / lessons would be helpful for us Noobs.

  1. Have you charged the battery yet.
    Charging Port.
    Plug in power to the USB-C port on the expansion board to charge the battery.
    It takes about 130 minutes to fully charge the battery.
    You then go to use work.
    If the battery will stop working after a few minutes of charging, we suggest you use a multimeter to measure what the voltage of the battery is after the battery is fully charged and let us know.
  2. Please follow the tutorial steps:
    Play Mode — SunFounder GalaxyRVR Kit for Arduino 1.0 documentation
    When you upload the code, move the switch to the right side and click “Upload”.
    After the code has been uploaded successfully, if you want to run the program, you need to activate the ESP32 CAM, please move the mode switch to the run position and press the reset button to restart the R3 board.
    https://docs.sunfounder.com/projects/galaxy-rvr/en/latest/_images/camera_upload.png
    https://docs.sunfounder.com/projects/galaxy-rvr/en/latest/_static/video/play_reset.mp4

  1. Yes, I had charged up the battery. I plugged the USB-C cable into the USB-C port on the RVR expansion board and let it charge for several hours. I noted that when I first plugged it in the red LED next to the charging port came on, but only stayed on for 3 - 5 minutes (I didn’t time it, but approximately). After it had been plugged in for a while ( a couple of hours) the red LED started to blink. I don’t remember how long it blinked, or if it stopped blinking when I unplugged the cable. At this point I still have not found any information concerning what the red LED is supposed to indicate. What does it mean when it turns on, what does it mean when it blinks, does it turn off when the battery is fully charged?

After the Rover had charged for several hours I unplugged the Rover and turned on the power switch and the Rover started moving. The program that was currently uploaded to the Rover was 8_ultrasonic_ir-avoid. The rover roamed around my house for about 90 seconds and stopped.

This morning I plugged the Rover back in with the USB-C charging cable. I let it charge up for about 2.5 hours. This time I checked the voltage on the battery.
Pins 1 - 3 : 8.25V
Pins 1 - 2 : 4.11V
Pins 2 - 3 : 4.11V
I set the Rover on the floor again and turned on the power switch. Again, the Rover roamed about my house for about 90 seconds then stopped. All lights turned off (IR Sensors, green power LED, etc). I tried pressing the reset button, no effect. I turned the power off then back on, no effect. I checked the voltages on the batter again and got the following readings:
Pins 1 - 3 : 8.17 V
Pins 1 - 2 : 4.08 V
Pins 2 - 3 : 4.08 V
I let the Rover sit for a few minutes then turned the power switch back on. The Rover started roaming about my house again, and again for only about 90 seconds, then shut off again. I checked the battery voltages again and had the following readings:
Pins 1 - 3 : 8.13 V
Pins 1 - 2 : 4. 06V
Pins 2 - 3 : 4. 06V
So I don’t think it’s a battery issue but don’t know what the problem is. When I upload the code for 9_rgb_car_move.ino, while it is sitting suspended and the blue cable plugged in to upload the code, the wheels start spinning to move the rover forward and a green light shows under the rover. it does this for 2 seconds, pauses just briefly, then the wheels spin to move forward again with a green light under the rover. It does the several times, then the motors start spinning more slowly, but continues with only forward motion and green light, it never changes to go backwards as indicated in the code. Further, when I disconnect the cables, set it on the floor and turn the power switch on, the car moves forward with a green light, stops and everything shuts off.

  1. I have been following the tutorial steps. Everything seemed to have worked fine until I got to the last part of lesson 9.
    (The link you provided for the “Play Mode” is not good, it takes me to a 404 "Documentation page not found.)

RvR Shield is the problem

An after-sales team will contact you later via your email address to send you a replacement expansion board and see if that solves the problem.

Thank you. I’m excited about continuing with this project.

I have continued on to Lessons 10 and 11. I have now installed the servo and the camera. For Lesson 10 I was able to upload the code for 10_servo_range and the servo moved as expected. For Lesson 11 I was able to connect using both the AP and STA mode to see the image through the camera. I was able to follow along with 11_camera_slider code and connect through the SunFounder controller app and get the readings through the serial monitor when I moved the slider. However, uploading the 11_camera_servo code and moving the slider in the controller app had no affect on the actual camera, the servo did not move at all. Not sure what’s happening here.

I’m very sorry, but there was a problem with our code.
You use the code we provided and see how it works.

#include "SunFounder_AI_Camera.h"
#include <Servo.h>

Servo myServo;  // create a servo object

// Wifi configuration and credentials
// AP Mode
#define WIFI_MODE WIFI_MODE_AP
#define SSID "GalaxyRVR"
#define PASSWORD "12345678"

// STA Mode
// #define WIFI_MODE WIFI_MODE_STA
// #define SSID "xxxxxxxxxx"
// #define PASSWORD "xxxxxxxxxx"

// Device configuration
#define NAME "GalaxyRVR"  // Device name
#define TYPE "AiCamera"   // Device type
#define PORT "8765"       // Port for the SunFounder Controller APP

// Create AiCamera Object
AiCamera aiCam = AiCamera(NAME, TYPE);

void setup() {
  // Initialize Serial(optional, if you need to debug)
  Serial.begin(115200);

  // Attach the servo on pin 6
  myServo.attach(6);

  // Initialize the AiCamera
  aiCam.begin(SSID, PASSWORD, WIFI_MODE, PORT);
  // Set the function to execute when data is received
  aiCam.setOnReceived(onReceive);
  // Set the command timeout
  aiCam.setCommandTimeout(100);
}

void loop() {
  // AiCamera loop. must put it in loop(). And more importantly, every time loop
  // runs, a perioad of data send receive runs, so loop must be fast enough.
  // or it will be laggy or even stuck by other code.
  aiCam.loop();
  
}

// Function to execute when data is received from the Controller
void onReceive() {
  // Get the value of the slider in region D
  int16_t sliderD = aiCam.getSlider(REGION_D);
  Serial.print("Slider D: ");
  Serial.println(sliderD);
  myServo.write(sliderD);
}

Perfect, that fixed the servo issue. On to Lessons 12 and 13.

1 Like